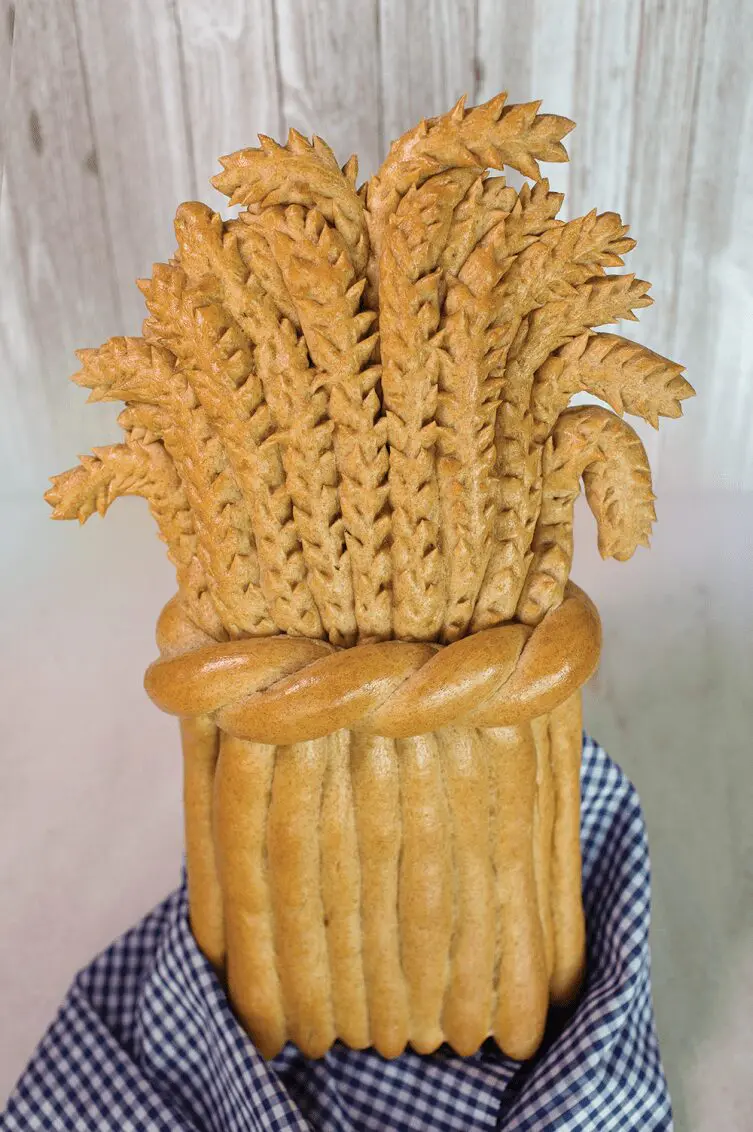
Wheat Sheaf
Prep Time 2 hours hours
Cook Time 25 minutes minutes
Total Time 2 hours hours 25 minutes minutes
Servings 2 sheafs
Baking Temp 350°F
Equipment
- 12" x 18" baking sheet
- Scissors
- Wire rack
Ingredients
- 2 teaspoons active dry yeast
- ½ cup lukewarm water (110°F-115°F)
- ½ teaspoon granulated sugar
- ½ cup vegetable shortening or butter
- ½ cup granulated sugar
- 1 large egg, beaten
- 1.5 teaspoon salt
- 2 cups milk, scalded and cooled to lukewarm
- 7 1/2 to 7 3/4 cups all-purpose flour or bread flour OR 4 cups whole wheat flour plus 3 1/4-3 1/2 cups all-purpose or bread flour
Instructions
For the Dough
- In small bowl, dissolve yeast in lukewarm water, stirring in ½ teaspoon sugar. Let stand 5 minutes.
- In mixer bowl, beat shortening with ½ cup sugar; add egg, salt, cooled milk, and dissolved yeast.
- Stir in flour a little at a time until dough is stiff enough to knead. Knead by hand or with dough hook 8 minutes or until smooth and elastic. Place in greased bowl; cover and let rise until doubled.
- Punch down dough. Shape as desired. Note: Dough may be kept covered in refrigerator for several days and used when needed.
Shaping the Wheat Sheaf
- Divide 1½ pounds of dough into 18 equal pieces. Roll out 8 (18" ropes) and 8 (15" ropes); cover. Tip: to roll dough evenly into a rope, start at the center and work toward the ends. On greased 12" x 18" baking sheet, place one 18" rope lengthwise in center. Bend top to the left. Place a second 18" rope beside the first rope, bending top to right. Repeat procedure.
- Place one 15" rope on each side bending top. Place remaining 15" ropes on top of bottom layer, placing ropes to cover the space between bottom ropes.
- Roll two pieces into thin ropes. Twist together and place across center, extending 1" past sheaf. Cut off extra; pinch ends together and tuck under sheaf.
- Cover; let rise 15-20 minutes. With scissors, make diagonal snips along bent “heads”. Beat 1 egg and 1 tablespoon water; brush on sheaf. Bake at 350°F, 20-25 minutes or until golden. If outer edges bake faster, tent with aluminum foil. Note: If you wish to use the sheaf for decoration, place it on a wire rack and let dry for several days.
- You might also enjoy these fall bread shapes from NationalFestivalofBreads.com:
- Corn on the Cob
- Harvest Grapes
- Creeping Crawling Spider
- Wicked Witch
- Pumpkin Rosettes
- Mini Cornucopias
- Fall Festival Pretzels
Subscribe to Our Newsletter
Stay up-to-date with everything wheat! Get useful tips, delicious recipes, health benefits, and the latest news about farming, straight to your inbox. Join our community today!
